What’s new in GVfs for GNOME 46?

It has been 3 years since my last post with release news for GVfs. This is mainly because previous releases were more or less just bug fixes. In contrast, GVfs 1.54 comes with two new backends. Let’s take a look at them.

OneDrive

One of the backends adds OneDrive support thanks to Jan-Michael Brummer. This requires setting up a Microsoft 365 account through the Online Accounts panel in the Settings application. Then the OneDrive share can be accessed from the sidebar of the Files application.

However, creating the account is a bit tricky now. You need to register on the Microsoft Entra portal to get a client ID. The specific steps can be found in the gnome-online-accounts#308 issue. Efforts are underway to register a client ID for GNOME, so this step will soon be unnecessary.

WS-Discovery

The other backend brings WS-Discovery support. It automatically discovers the shared SMB folders of the Windows devices available on your network. You can find them in the Other Locations view of the Files application. This has not worked since the NT1 protocol was deprecated. For more information on this topic, see my previous post.

You won’t find the Windows Network folder in the Other Locations view, all the discovered shares are directly listed in the Networks section now.


Finally, I would like to thank all the GVfs contributors. Let me know in the comments if you like the new backends. I hope the next releases will also bring some great news.

Discovering SMB shares in GNOME

Available SMB shares can be found using the Other Locations view in the Files application in addition to other network shares and devices that also appear there. This internally uses several backends and volume monitors provided by the GVfs project, as I explained in my previous blog post.

Just a note that there are plans to replace the Other Locations view with a Network view.

mDNS/DNS Service Discovery

Services that appear there are most likely published via the mDNS/DNS-SD protocols these days. The SAMBA shares on Linux systems are automatically published to the network via this protocol if the Avahi daemon is installed and running. It is also natively supported on Apple systems. The problem is with Windows systems. As far as I can tell, Windows still supports the mDNS protocol for resolving .local hostnames only, but shares are not automatically published or discovered. It is only supported by some third-party applications (e.g. from Apple).

SMB1/NetBIOS Service Discovery

The NetBIOS Service Discovery had been used for years to discover Windows shares. It is available over the SMB1 protocol, also called NT1 in the SAMBA project. Unfortunately, this protocol is now disabled by default because it is outdated and vulnerable. If I’m not mistaken, the latest Windows systems don’t even allow it to be enabled. This is why Windows shares are not available in the “Other Locations” view and why the Windows Network folder is empty in most cases.

Web Service Device Discovery

Windows systems rely primarily on the WS-Discovery protocol instead. It is quite easy to publish SMB shares from Linux to make them visible to Windows systems. There are wsdd and other similar projects for this purpose. But the discovery of these shares in Linux in general is not ideal. As far as I can tell, only the KDE environment provides graphical file managers that support this protocol. This is possible thanks to its implementation in the KIO extras project. GNOME doesn’t support it yet.


The big news is that I recently proposed a WS-Discovery backend for the GVfs project. It doesn’t implement the protocol itself, but uses the wsdd project’s API. There are still some small things that would be nice to improve, but I hope this will be part of GNOME 46 to make Windows shares visible again!

What locations does GVfs provide?

You probably all know that you can easily access files on connected devices using the sidebar items in the Files application. Most of you also know that the Other Locations view provides access to internal storage and some other discovered services. But I have recently noticed that some people are completely unaware of the ability to connect to locations that are not propagated by our volume monitors or discovery backends. And even if people are aware of this option, they often don’t know which locations are supported. So I decided to write this blog spot to summarize what all URI schemes are handled by the GVfs project for use by the Files and other GNOME applications.

Connecting to locations

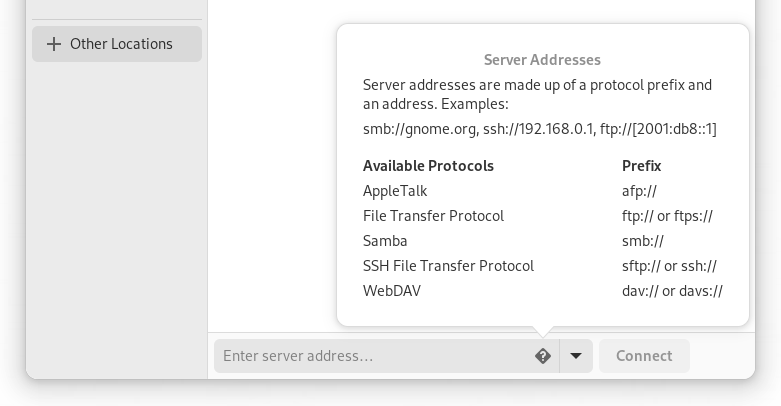
For locations that are not automatically propagated, there is the following bar in the Other Locations view of the Files application. You can enter a URI and press the Connect button to mount some additional locations. The question mark icon suggests some of the URI schemes you can use.

Network protocols

To connect to devices on your network, cloud providers, or web hostings, there is a list of network protocols that can be used:

  • SMB – Uses the smb:// scheme, so e.g. smb://host/share.
  • FTP – There are 3 different protocol schemes for the FTP protocol:
    • ftp:// for unencrypted connection
    • ftps:// for explicit SSL/TLS encryption
    • ftpis:// for implicit SSL/TLS encryption
  • SFTP – Uses the sftp:// scheme (the ssh:// alias can also be used).
  • WebDAV – There are the dav:// and davs:// schemes, corresponding to the HTTP and HTTPS variants.
  • NFS – Uses the nfs:// scheme. Only NFSv2 and NFSv3 protocol versions are supported.
  • AFP – Uses the afp:// scheme.

Just a note that there is also support for the HTTP protocol over the http:// and https:// schemes, although this is not intended to be used through the Files application.

Network discovery

Available locations on your local network can be automatically listed in the Other Locations view thanks to the network backend (the network:// scheme). The network backend merges results from other backends that implement the DNS-SD/mDNS and NetBIOS protocols (these use the dns-sd:// and smb:// schemes).

NetBIOS-based discovery has been deprecated along with the NT1 protocol, which is why the Windows Network folder in the Other Location view is empty in most cases. Instead, Microsoft relies on the WS-Discovery protocol. This is not yet supported by the GVfs project but it is in development.

Connected devices

Connected devices are always propagated by volume monitors and are not expected to be mounted manually. Cell phones, cameras, and audio players typically use the MTP, PTP, and AFC protocols (with the mtp://, gphoto2://, and afc:// schemes). Mass storage devices (e.g. portable flash disks and hard disks) and optical disks are announced via the UDisks2 volume monitor and use the file:// scheme. Only audio disks are accessible via the cdda:// scheme.

There is also a special burn:// scheme for blank optical media, but Brasero integration is currently broken.

Online Accounts

The Online Accounts panel in the Settings application allows users to configure their Nextcloud and Google accounts, among others. You can then easily access your files from these providers via the sidebar items in the Files application. These are propagated through the GOA volume monitor and use the davs:// and google-drive:// schemes.

Just a note that Google Drive support has not been ported to libsoup3 and may be unavailable soon. By the way, OneDrive support is in the works.

Special locations

The GVfs project also provides some special locations. The recent:// scheme allows you to browse recent files. The admin:// scheme allows you to access files with elevated privileges. The archive:// scheme can be used to browse archive files without extracting them. It was supposed to be integrated into the Files application, but that never happened. Not sure if anyone uses it today. The computer:// scheme is used to provide a list of connected devices. It is no longer used by the Files application, but some other file managers still use it.

For completeness, there are also the test:// and localtest:// schemes for testing purposes.


The specific list of supported locations is always dependent on the installed packages, but mainstream distributions should have most of them installed by default. I hope this gives you a better idea of the locations provided by the GVfs project that are available in GNOME. Which protocols do you use most?

What’s new in GVfs for GNOME 40?

Unfortunately, my contributions to various projects have been limited over the last months given the various coronavirus-related restrictions. Also, I took over gnome-autoar maintainership recently on which I spent some time. So GVfs doesn’t bring as much news as I would like, but there are some which are worth mentioning.

Google Shared Drives and Shared with me

Definitely, the biggest changes happened in the Google backend. It is now possible to browse files on Shared Drives (formerly Team Drives). Also, support for the Shared with me folder was added. So it is possible to browse files that are shared with the user but not added to his drive. These two features were merged together with various smaller bug fixes and improvements.

SFTP supports two-factor authentication

It is now possible to access SFTP shares, which are guarded by two-factor authentication. This was not possible earlier, the backend hanged during the mount procedure and the connection timeouted. Currently, two password prompts should be shown instead.

Possibility to disable trash

In some cases, the trash support is not desired, for example on shared mounts, or for automounted locations. Now, the x-gvfs-notrash mount option can be used, which causes that the gvfsd-trash daemon ignores that mount and the g_file_trash() function returns an error. This is actually already part of GNOME 3.38, but I didn’t make a separate post for that release.


In the end, I would like to thank all who made some contributions during this cycle even small ones, especially to all newcomers.

Devhelp on Fedora Silverblue

I have recently switched to Fedora Silverblue. The recommended way for development is to use Fedora Toolbox containers, so I have started using it and installed the various development packages there. I like the Devhelp application for browsing the API documentation. So I installed that application over GNOME Software. But the problem is that the Devhelp application started from GNOME Shell doesn’t see the documentation files which are located under the Toolbox container. This is probably expected, but it is annoying. Starting the Devhelp application from the terminal over toolbox run flatpak run org.gnome.Devhelp is pretty cumbersome.

To solve this issue, I simply copied the org.gnome.Devhelp.desktop file from /var/lib/flatpak/app/org.gnome.Devhelp/current/active/files/share/applications to ~/.local/share/applications and modified the Exec and DBusActivatable lines the following way:

Exec=toolbox run flatpak run org.gnome.Devhelp
DBusActivatable=false

Now I can easily start the Devhelp application from GNOME Shell to see all the documentation files from the Toolbox container. I hope that this short post helps other people. Let me know in the comments if there is a better way to achieve this…

EDIT: This solution, unfortunately, stopped working soon after publishing the post. But see the comment section for alternative approaches and choose the one which fits you best.

Testing applications using Flatpak

There are many ways to test merge requests or development branches for GNOME applications. Developers usually clone the repository and build the code manually, or with the help of some tools. Newcomers are advised to use Builder, or BuildStream. However, if one doesn’t want to build the code and just test something, it might be handly to use Flatpak bundle instead. Note that this post assumes some basic Flatpak knowledge and that Flatpak is already installed on your system.

Files (Nautilus) and many other GNOME applications build Flatpak bundle as a part of their GitLab CI and CI artifacts can be used for testing. For example, to test some merge request, one has to wait until the CI is finished at first. Consequently, “View exposed artifact” needs to be expanded. Then, “Get Flatpak bundle here” can be used to download the artifact for Files (the title differs across projects).

After that the downloaded repo.tar archive needs to be extracted:

$ tar --extract --file repo.tar

Consequently the org.gnome.NautilusDevel application can be installed from the local repository (for other applications the different identifier has to be used obviously). This step also requires that the gnome-nightly remote is already added:

$ flatpak remote-add --if-not-exists gnome-nightly https://nightly.gnome.org/gnome-nightly.flatpakrepo
$ flatpak install --reinstall --user ./repo org.gnome.NautilusDevel

Then it should be possible to start the application from applications overview, but it can be started manually as well:

$ flatpak run org.gnome.NautilusDevel

Note that sometimes it is necessary to delete application data when for example testing some changes, which are not backward compatible:

$ rm -r ~/.var/app/org.gnome.NautilusDevel

See Flatpak website to learn more about Flatpak.

What’s new in Files (and GVfs) for GNOME 3.36?

After Carlos Soriano and Ernestas Kulik left Files (Nautilus) development, António Fernandes and I are now officially new maintainers. Given the limited manpower, the focus is more on fixing bugs, but some neat new features have been added to Files and GVfs as well. I just explain shortly that GVfs provides access to various protocols and remote shares for Files among others. I hope I will find some time soon to write a new post about GVfs in general. But let’s move back to the news in this release.

Hidden files as templates

Hidden files (resp. files beginning with a dot) can be now also used as templates. So you can simply create for example .htaccess or .gitignore over the context menu if you add those files in your templates dir. I just note that they are visible in the context menu only if hidden files are shown.

Move and copy support on Google Drive

Mayank Sharma provided missing support for the move and copy operations for Google Drive backend. He worked on it mainly during Google Summer of Code last year. It took such a long time especially because Google Drive is not a classical filesystem and there are many and many corner cases that need to be handled. If you are interested in details, you can find some on his blog, or on GitLab issue.

I would like to mention here one new related gio tool feature. Google Drive files are represented by database IDs and their titles are stored as separate attributes. So it is hard to work with those files from the command line. But now you can use gio list --print-display-names [URI] to easily show the titles instead of the unreadable IDs.

GOA shares with self-signed certificates

Earlier it was not been possible to access Nextcloud or ownCloud shares configured over Gnome Online Accounts (GOA) if they used self-signed or invalid certificates. Now you should see a prompt to confirm such certificate during the mount operation.

Also here, I would like to mention one related GLib improvement. You can now use gio mount --device [UUID] to mount shares configured over GOA. This will cause that credentials from GOA are used and don’t have to be specified manually.


In the end, I would like to thank all who made some contributions during this cycle, especially to all newcomers. Also, I would like to thank António, who helps me to get familiar with Files and does a great job as maintainer.

Clean and linear history with GitLab

Many GNOME projects still use clean and linear commit history without merge commits even after porting to GitLab. That means that each commit represents one comprehensive feature or bug fix and there are not any side branches. I am not about to discuss the pros and cons of this approach here, you can find many and many posts on this topic on the internet. I would like to explain some common issues for newcomers when using GitLab forks.

To make some contribution, one has to create a fork of some repository, push desired changes in a new branch and create a merge request to the original project. Please be sure that the “Allows commits from members who can merge to the target branch” checkbox is checked when creating the merge request (or later using the “Edit” button on the top of the page). This is needed to simplify the consequent workflow for the contributor (and maintainers as well). One of the reasons, why this is needed is the fact, that the changes need to be often rebased before they can be merged (to ensure the linear history). Maintainers can’t do this when this feature is not enabled and have to ask contributors to do so. Another reason is that the maintainers can do some changes when the contributor needs help or doesn’t have time to do the changes itself.

When the merge request is created, maintainers usually make a review of the proposed changes and ask the contributor to change something. The existing commits need to be updated using e.g. git commit --amend, or git rebase --interactive (to ensure clean history). Then git push --force has to be used to update the remote branch. This is the right way and it is expected that the --force option is used, there is no other way to update the existing commits.

See GNOME Wiki, GitLab Docs and Git Documentation to get more info about these topics.

How to call asynchronous function synchronously

GLib provides a lot of asynchronous functions, especially to deal with I/O. Unfortunately, some functions don’t have synchronous equivalents and the code has to be split into several callbacks. This is not handy in some cases. My this year’s GSoC student recently asked me whether it is possible to create synchronous function from asynchronous. He is currently working on test suite and don’t want to split test cases into several callbacks. So I decided to write a blog spot about as it might be handy for more people. Let’s explain it with an example on how to create g_file_mount_enclosing_volume_sync () from g_file_mount_enclosing_volume ():

typedef struct
{
  GMainLoop *loop;
  GAsyncResult *res;
} MountData;

static void
mount_cb (GObject *source_object,
          GAsyncResult *res,
          gpointer user_data)
{
  MountData *data = user_data;

  data->res = g_object_ref (res);
  g_main_loop_quit (data->loop);
}

static gboolean
g_file_mount_enclosing_volume_sync (GFile *location,
                                    GMountMountFlags flags,
                                    GMountOperation *mount_operation,
                                    GCancellable *cancellable,
                                    GError **error)
{
  g_autoptr (GMainContext) context  = NULL;
  g_autoptr (GMainLoop) loop = NULL;
  MountData data;
  gboolean retval;

  context = g_main_context_new ();
  loop = g_main_loop_new (context, FALSE);
 
  g_main_context_push_thread_default (context);

  data.loop = loop;
  g_file_mount_enclosing_volume (location,
                                 flags,
                                 mount_operation,
                                 cancellable,
                                 mount_cb,
                                 &data);
  g_main_loop_run (loop);
  retval = g_file_mount_enclosing_volume_finish (location, data.res, error);
  g_object_unref (data.res);

  g_main_context_pop_thread_default (context);

  return retval;
}

A similar approach can be seen on various places of GLib and GVfs source codes.